

The Chocolate Snapped Instead of Melted
I used cheap chocolate. First mistake, and I knew better.
It seized up in the bowl, turned grainy. I added a spoonful of coconut oil and stirred frantically. It smoothed out, but barely.
Quick tip: Chop the chocolate fine. Even pieces melt evenly. Uneven chunks burn before the big ones soften.
I remember my grandmother’s chocolate block. She always grated it. Never chopped. I do the same now.
The texture matters more than the brand.
The Cup Walls Kept Collapsing
I painted the chocolate up the sides with a spoon. It dripped back down. Every time.
I froze them for ten minutes. Still soft. Fifteen. Better. Twenty. Finally.
One honest admission: I ate three failed shells standing at the counter. They tasted fine. They looked terrible.
Don’t rush the freezing. It’s not optional.
About the Caramel
I used store-bought dulce de leche. Not ashamed.
Thick, dark, a little bitter from the salt I added. Better than anything I could make from scratch at 9 PM on a Tuesday.
But I stirred in cold cream. It seized. Little lumps appeared. I microwaved it for 10 seconds and whisked. Fixed, barely.
Warm the cream next time. Room temperature at least. It’s a detail the blogs never mention.
The Salt Flew Everywhere
Fleur de sel is expensive and I launched half of it across the counter.
Pinch it between your thumb and index finger. Tap your thumb against your finger. Low drift. More on the cup.
I’ve made worse. Once I used table salt. The cups were inedible. Salty, metallic, wrong.
Use flaky salt. Not fine. Not iodized.
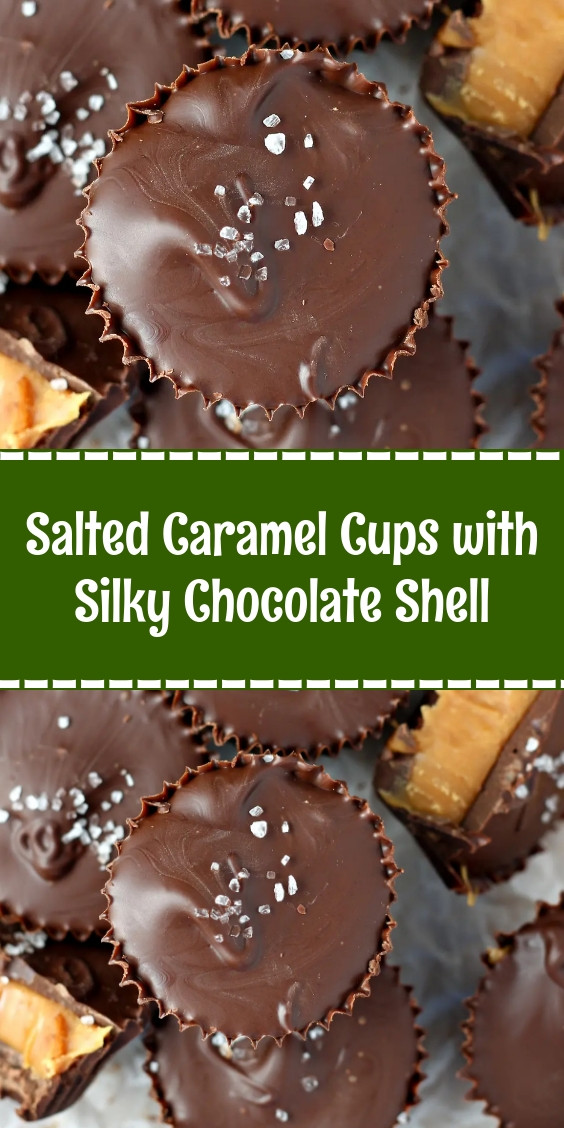
They Set in the Fridge, Finally
After two hours, the shells were hard. The caramel was soft in the center. The salt glistened on top.
I bit into one. The shell cracked clean. Caramel didn’t spill. That was the moment.
I brought them to my neighbor. She said “these are better than the bakery ones.” She meant it.
Honestly? Not that deep. Good chocolate, good caramel, enough salt, and patience.
How to Make It
Step 1: Line a muffin tin with 12 paper liners. Use the sturdy foil ones if you have them. The paper collapses less.
Step 2: Melt 4 oz dark chocolate with 1 tablespoon coconut oil over a double boiler. Stir until completely smooth. (Don’t let any water touch the bowl or the chocolate seizes instantly.)
Step 3: Spoon 1 teaspoon melted chocolate into each liner. Use the back of the spoon to coat the bottom and sides. Freeze for 15 minutes. I checked at 12 and it wasn’t enough.
Step 4: Combine 1 cup dulce de leche, 2 tablespoons heavy cream, 1 teaspoon vanilla extract, and 1 teaspoon sea salt in a small bowl. Stir until blended. Taste it. Too salty? Add less next time.
Step 5: Remove the chocolate cups from the freezer. Fill each with 1 tablespoon caramel mixture. Don’t overfill. Leave a little rim of chocolate visible.
Step 6: Melt the remaining 4 oz chocolate with 1 tablespoon coconut oil. Spoon 1 teaspoon over each caramel-filled cup. Seal the edges completely. If caramel pokes through, it will leak later. Have you ever had a caramel cup leak on you? Share below!
Step 7: Sprinkle each cup with a pinch of fleur de sel while the top chocolate is still warm. The salt sticks better this way.
Step 8: Refrigerate for at least 2 hours. I left mine for 3 because I forgot. They were fine. Overnight works too.
Step 9: Remove from liners carefully. If they stick, let them sit at room temp for 5 minutes. Store in an airtight container in the fridge for up to 2 weeks.
Ways to Change It Up
Try this: Use white chocolate instead of dark. It’s sweeter. Use less salt.
Try this: Add a thin layer of peanut butter between the caramel and the chocolate. Just a teaspoon. Spread it flat before freezing.
Try this: Swap the dulce de leche for homemade salted caramel sauce. It’s runnier, so freeze the cups for an extra 10 minutes before adding the top layer.
Which would you go for? Drop it in the comments.
How to Serve It
Serve straight from the fridge. They soften too fast at room temperature.
Pair with black coffee. The bitterness cuts the sweetness. Or with a glass of cold milk. That’s classic.
I’ve also crushed one over vanilla ice cream. Crumbled the shell, spooned the caramel on top. Messy. Worth it.
What would you pair it with?
Storing It Without Ruining It
Airtight container in the fridge. That’s it.
They last 2 weeks. I tested one at 3 weeks. The chocolate bloomed. White spots. Still edible but ugly.
Freezer: Place them in a single layer in a freezer-safe container. Layer parchment between rows. They last 3 months. Thaw in the fridge for 20 minutes before eating.
Do not microwave to thaw. The caramel liquifies. The shell cracks. You get a puddle.
Have you ever saved leftovers like this? Tell me below!
Mistakes I Made So You Don’t Have To
1. I used cheap chocolate. It seized. It tasted waxy. The shells cracked. Spend the extra dollar.
2. I overfilled the caramel. It leaked over the edges. Stuck to the liner. The cups looked like blobs. Fill to 3/4 of the chocolate cup. Not all the way.
3. I once forgot the salt. The cups were flat. One-note. Sweet and then nothing. Salt is not optional. It’s the only thing that makes them interesting.
Did something like this happen to you?
Your Questions, Answered
Can I use milk chocolate? Yes. It’s sweeter and softer. Chill them an extra 30 minutes before serving.
My chocolate seized. Can I fix it? Sometimes. Add 1 teaspoon of coconut oil or butter per 2 oz chocolate. Stir over low heat. If it doesn’t smooth out, start over. I tried fixing it once and it never fully recovered.
Can I use homemade caramel? Yes, but it needs to be thick. If it’s runny, cook it longer or chill it before filling the cups.
Why use coconut oil? It thins the chocolate. Makes coating easier. Butter works too but coconut oil gives a cleaner snap.
Can I skip the salt? Don’t. It’s the only thing that cuts the sweetness. The cups taste flat without it.
Can I double this? Yes. Use two muffin tins. Double the ingredients. The timing stays the same.
Which answer helped you most?
One Last Thing
These cups are not complicated. They’re chocolate, caramel, salt, and patience.
I made a batch last week and gave half away. The other half is still in my fridge.
I ate one this morning. The shell cracked. The caramel stayed. The salt hit first.
I think I’ll make another batch tomorrow.
Will you make this soon?
Happy cooking! —Danielle Monroe
Fun fact: Fleur de sel has been harvested off the coast of France since the 7th century. It’s the oldest salt still used in cooking.
Salted Caramel Cups with Silky Chocolate Shell
Ingredients
- 8 oz dark chocolate, chopped
- 2 tablespoons coconut oil or butter
- 1 cup dulce de leche or caramel sauce
- 2 tablespoons heavy cream
- 1 teaspoon vanilla extract
- 1 teaspoon fleur de sel or sea salt
- Pinch of fleur de sel for topping
Instructions
- 1Line a muffin tin with 12 paper liners.
- 2Melt 4 oz dark chocolate with 1 tablespoon coconut oil over a double boiler, stirring until smooth.
- 3Spoon 1 teaspoon melted chocolate into each liner, coating the bottom and sides using the back of a spoon. Freeze for 15 minutes.
- 4Combine dulce de leche, heavy cream, vanilla extract, and 1 teaspoon sea salt in a small bowl, stirring until well blended.
- 5Remove chocolate cups from freezer and fill each with 1 tablespoon caramel mixture.
- 6Melt remaining 4 oz chocolate with 1 tablespoon coconut oil. Spoon 1 teaspoon over each caramel-filled cup, sealing the edges.
- 7Sprinkle each cup with a pinch of fleur de sel while chocolate is still warm.
- 8Refrigerate for at least 2 hours or until completely set.
- 9Remove from liners and store in an airtight container in the refrigerator for up to 2 weeks.
Notes
See full recipe for nutritional information.


