

The orange zest smelled like something I couldn’t fix.
I’d grated it too fine, and it was clumping in the sugar bowl. I was already annoyed at myself.
But I’d promised a cake for a friend’s birthday, and orange and chocolate was the only thing she asked for. So I started over.
The coffee was still warm from breakfast. Strong, black, leftover. I used it anyway.
Why This Cake Works
It’s not fancy. It’s not fussy. But the combination of coffee and orange does something that straight chocolate cake can’t.
The coffee deepens the cocoa without making it taste like coffee. The orange cuts through the richness without being sweet.
I’ve made worse. Honestly? Not that deep.
About the Orange
You need two whole oranges. Zest them both first, then juice them.
I used to skip the zest thinking the juice was enough. It’s not. The zest holds the essential oil that makes the flavor pop.
My grandmother used to say orange zest was the only thing worth fighting the microplane for. She was right.
One specific memory: I was eight, standing on a stool, watching her zest an orange so thin you could see through it. She never used a knife. Just the grater and her thumb.
The Coffee Is Not Optional
I know some recipes say you can sub hot water. Don’t.
The coffee doesn’t add caffeine or a bitter edge. It adds depth. Like a bass note in a song you don’t notice until it’s gone.
I tried it once with decaf just to see. Flat. Hollow. Not worth the calories.
Quick tip: Brew the coffee double-strength if you’re using a light roast. Otherwise, the flavor gets lost.
The Batter Is Weird. That’s Fine.
When you pour the coffee into the wet ingredients, it looks thin. Watery. You’ll think you messed up.
You didn’t.
The batter is supposed to be loose. It’s a liquid batter, not a stiff one. That’s what makes the cake moist and tender instead of dense and dry.
I stood over the bowl for a full minute the first time, sure I’d forgotten something. I hadn’t.
The Frosting Fight
This frosting is not stable. If you want something that pipes perfectly and holds a rosette, pick a different recipe.
It’s soft. Slightly glossy. It sinks into the cake layers instead of sitting on top. I prefer it that way.
But if you let it sit too long, it firms up. If you add too much orange juice, it slides right off. I’ve scraped frosting off a cake and started over more times than I’ll admit.
One batch came out so thin I just poured it over the top like a glaze. Everyone said it was better that way. I didn’t agree, but I ate it anyway.
How to Make It
Step 1: Preheat the oven to 350°F (175°C). Grease and flour two 9-inch round cake pans. I use butter and a dusting of cocoa powder instead of flour. It helps the cake release better. But flour works fine too. (Don’t use spray oil unless you want the edges to stick.)
Step 2: In a large bowl, whisk together the dry ingredients — flour, sugar, cocoa powder, baking soda, baking powder, and salt. Sift them if you’re feeling precise. I never do. Just whisk until no lumps remain.
Step 3: In another bowl, beat the eggs. Then add buttermilk, coffee, oil, vanilla, and orange zest. Whisk until uniform. The zest will want to clump. Keep whisking. My daughter once asked why the batter looked like a science experiment. I had no good answer.
Step 4: Combine wet and dry ingredients. Stir until just blended. Don’t overmix. A few streaks of flour are fine. They’ll disappear in the oven. Overmixing makes the cake tough and I’ve done it enough to know.
Step 5: Divide the batter evenly between the two prepared pans. Tap the pans on the counter a few times to pop air bubbles. (Do this on a towel, not bare counter. I chipped a pan once. Not worth it.)
Step 6: Bake for 35-40 minutes. Start checking at 32 minutes. A toothpick inserted in the center should come out clean or with a few moist crumbs. Not wet batter. Not dry crumbs. Softer than you think is done.
Step 7: Cool cakes in pans for 15 minutes. Then turn them out onto wire racks to cool completely. Do not skip this. If you turn them out too early, they’ll tear. If you wait too long, they’ll stick. Fifteen minutes. Set a timer.
Step 8: For the frosting, beat the softened butter until creamy. About 2 minutes on medium speed. Scrape the bowl once.
Step 9: Gradually add powdered sugar and cocoa powder. Beat on low until combined, then medium for 2 minutes. It will look dry at first. Keep going.
Step 10: Add orange juice a little at a time. One tablespoon, beat, another tablespoon, beat. Stop when the frosting is spreadable but not runny. I usually use 2.5 tablespoons. Depends on the day.
Step 11: Place one cake layer on a serving plate. Spread a generous layer of frosting on top. Don’t be shy.
Step 12: Add the second cake layer. Frost the top and sides generously. This is not a neat cake. Let it look a little messy.
Step 13: Garnish with orange zest and chocolate shavings if you want. Or leave it plain. It tastes the same either way.
Step 14: Slice and serve chilled or at room temperature. I prefer room temperature. The cake is softer. The frosting is creamier. Do you prefer cold or room temp cake? Share below!
Ways to Change It Up
Try this: Swap the orange juice for blood orange juice and use the zest from two blood oranges. The cake turns a deep pink-red inside. It’s stunning and tastes slightly more tart.
Try this: Add a teaspoon of cinnamon and a pinch of cayenne to the dry ingredients. It makes the chocolate taste warmer and more complex. I do this in winter.
Try this: Skip the frosting entirely and dust the cake with powdered sugar and extra zest. Serve with whipped cream or vanilla ice cream. Less sweet. More direct.
Which would you go for? Drop it in the comments.
How to Serve It
This cake works best as a simple dessert. Not a centerpiece.
Serve it alongside a cup of black coffee or a cold glass of milk. The bitterness balances the sweetness.
If you’re feeling extra, add a dollop of lightly sweetened mascarpone on the side. Or a scoop of vanilla bean ice cream.
I ate the last slice with a spoon standing over the sink. No regrets. What would you pair it with?
Storing It Without Ruining It
Room temperature for up to 2 days, covered. The cake stays moist but the frosting softens more.
Fridge for up to 5 days. Wrap the cake tightly in plastic wrap or place in an airtight container. If you don’t wrap it, it’ll absorb fridge smells. Trust me on this one.
Freezer for up to 3 months. Wrap each cake layer individually in plastic wrap, then foil. Freeze without frosting. Thaw overnight in the fridge before frosting.
To reheat: Microwave a slice for 10-15 seconds if you want it warm. Or leave it out for 30 minutes to come to room temperature. Don’t microwave the whole cake.
Have you ever saved leftovers like this? Tell me below!
Mistakes I Made So You Don’t Have To
The cake sinks in the middle if you open the oven door in the first 25 minutes. I know. I did it.
I once forgot the buttermilk. Used regular milk and added a tablespoon of vinegar. It worked, but the cake was slightly less tender. Not worth the shortcut.
I’ve overfrosted and had the top layer slide off entirely. A beautiful cake disaster. I cut it into cubes and called it trifle.
Don’t zest the oranges too far in advance. The zest dries out and loses its volatile oils. Zest right before you use it. Did something like this happen to you?
What About the Frosting? And Other Questions
Can I use orange extract instead of fresh juice? You can, but it won’t taste the same. Fresh orange juice gives a brightness and acidity that extract can’t mimic. I tried it once. It was fine but forgettable. Use fresh.
Do I have to use buttermilk? Yes. The acidity activates the baking soda and helps the cake rise. Regular milk won’t do the same. If you don’t have buttermilk, add 1 tablespoon of lemon juice or vinegar to ¾ cup of milk and let it sit for 5 minutes. That’s the backup plan.
Can I make this gluten-free? Maybe. I’ve used a 1:1 gluten-free flour blend once. The cake was denser and crumbly. Edible, but not the same. If you try it, add 1 teaspoon of xanthan gum if your blend doesn’t include it. But I’m not promising anything.
Why does my frosting taste grainy? You didn’t beat the butter long enough. Or you added all the powdered sugar at once. Beat the butter for a full 2 minutes until it’s pale and fluffy. Then add sugar gradually. Also, sift your powdered sugar if it’s lumpy.
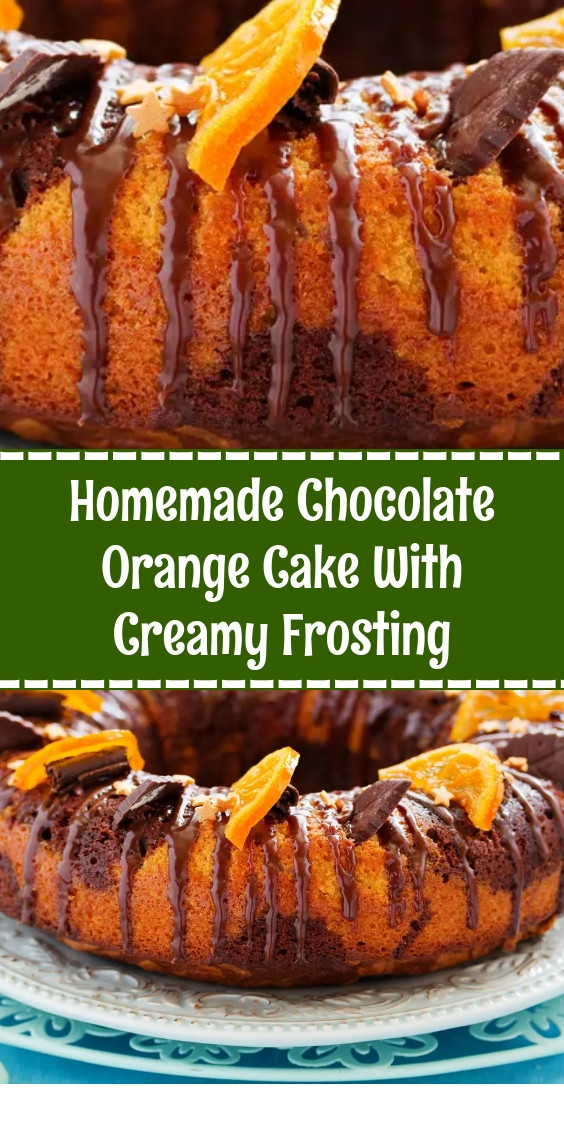
Can I make this a bundt cake? Yes. Grease a 12-cup bundt pan well. Bake for 45-50 minutes. Check with a skewer. The cooking time varies because bundt pans are thicker. Start checking at 40 minutes. And don’t forget to tap the pan before baking to release air bubbles.
How do I get clean slices? Use a serrated knife and wipe it clean between cuts. Chill the cake for 20 minutes before slicing. The frosting firms up just enough to cut cleanly. I learned this after years of smeared slices. Which answer helped you most?
One Last Thing
This cake disappears fast. I don’t know why. Maybe it’s the orange taking the edge off the chocolate. Maybe it’s the coffee.
I made it once for a brunch. Everyone asked for the recipe. I gave it to them. Two people said they made it that same week. That’s rare.
I’m not saying this is the best chocolate orange cake in the world. I’m saying it’s the one I keep going back to.
The frosting still slides sometimes. The cake still sinks if I’m careless. That’s the point. It’s not a perfect recipe. It’s a real one.
Will you make this soon?
Happy cooking! —Danielle Monroe
Fun fact about chocolate: The scientific name for the cacao tree is Theobroma cacao, which means “food of the gods.” I don’t know if I’d go that far, but it’s not wrong.
Homemade Chocolate Orange Cake With Creamy Frosting
Ingredients
- 2 cups all-purpose flour
- 1¾ cups sugar
- ¾ cup unsweetened cocoa powder
- 2 teaspoons baking soda
- ½ teaspoon baking powder
- ½ teaspoon salt
- 2 large eggs
- ¾ cup buttermilk
- ¾ cup strong brewed coffee
- ⅓ cup vegetable oil
- 1 teaspoon vanilla extract
- Zest of 2 oranges
- ½ cup fresh orange juice
- ½ cup unsalted butter, softened
- 3 cups powdered sugar
- 3 tablespoons cocoa powder
- 3 tablespoons fresh orange juice
- 1 tablespoon orange zest for garnish
Instructions
- 1Preheat oven to 350°F (175°C). Grease and flour two 9-inch round cake pans.
- 2In a large bowl, whisk together flour, sugar, cocoa powder, baking soda, baking powder, and salt.
- 3In another bowl, beat eggs, then add buttermilk, coffee, oil, vanilla extract, and orange zest. Mix well.
- 4Gradually combine wet ingredients with dry ingredients, stirring until just blended.
- 5Divide batter evenly between prepared pans.
- 6Bake for 35-40 minutes, or until a toothpick inserted in the center comes out clean.
- 7Cool cakes in pans for 15 minutes, then turn out onto wire racks to cool completely.
- 8For frosting, beat softened butter until creamy.
- 9Gradually add powdered sugar and cocoa powder, beating well.
- 10Add orange juice a little at a time until frosting reaches desired consistency.
- 11Place one cake layer on a serving plate. Spread frosting on top.
- 12Add second cake layer and frost the top and sides generously.
- 13Garnish with orange zest and chocolate shavings if desired.
- 14Slice and serve chilled or at room temperature.
Notes
See full recipe for nutritional information.


